🌱 Growing in Grow Bags: The Smart, Flexible Way to Garden Anywhere
If you want to grow your own food but don’t have access to a big backyard or any soil, grow bags might just become your best friend. These lightweight, breathable containers have become a staple for small-space gardeners, urban homesteaders, and microsteaders worldwide. They’re affordable, versatile, and surprisingly productive. In this guide, we’ll explore why grow bags work so well, how to use them, and how to get the most out of your harvests.
🛍️ What Are Grow Bags?
Grow bags are fabric containers, usually made of thick nonwoven polypropylene or recycled plastic fibers. Unlike traditional pots, these bags allow air and water to move freely through the material. This leads to a key benefit known as air pruning—when roots reach the edge of the bag, they’re exposed to air and naturally stop growing, causing the plant to send out new roots instead. The result? a dense, fibrous root system and healthier plants overall.
💪 Benefits of Using Grow Bags
- 🌬️ Improved root health due to air pruning
- 🚚 Lightweight and portable — move them easily to chase the sun or avoid storms
- 🌡️ Better drainage than plastic or ceramic pots, reducing root rot
- 🧼 Easy to store flat when not in use
- ♻️ Made from recycled or upcycled materials in many cases
- 💰 Budget-friendly — often less expensive than raised beds or ceramic pots
📏 Choosing the Right Size Grow Bag
Grow bags come in all sizes — from tiny 1-gallon herb bags to massive 30-gallon tree planters. For most vegetables, here are some practical starting points:
Download The Quickstart Guide
- 🪴 1–3 gallons: Herbs like basil, thyme, cilantro
- 🥕 5–7 gallons: Leafy greens, carrots, bush beans
- 🍅 10–15 gallons: Tomatoes, eggplants, peppers
- 🍠 15–20 gallons: Root crops like sweet potatoes and potatoes
Larger bags can also be used for multi-plant combos like a lettuce mix or salsa garden (tomatoes, cilantro, onions, peppers).
🧱 Setup Tips for Grow Bag Success
Setting up your grow bags properly is key to getting great results. Here's what you need to know:
- Place them on a flat, solid surface with drainage (concrete, bricks, gravel, etc.)
- Line the bottom with a thin layer of mulch or cardboard to retain moisture
- Use a lightweight, nutrient-rich soil mix — compost + coco coir + perlite works great
- Water frequently — grow bags dry out faster than hard-sided containers
- Add a drip system or use a self-watering insert like the BottleCore™ for consistent hydration
💧 Watering Grow Bags
Because of their breathable material, grow bags lose water faster than traditional pots. That’s not a flaw — it just means you’ll need to stay consistent. Check your bags daily in warm weather. Many growers use saucers or shallow trays underneath to catch runoff and help reabsorb moisture.
Combine grow bags with a wicking system or a vertical gravity-fed watering insert for ultimate ease. These hybrid systems reduce labor while still providing your plants with what they need.
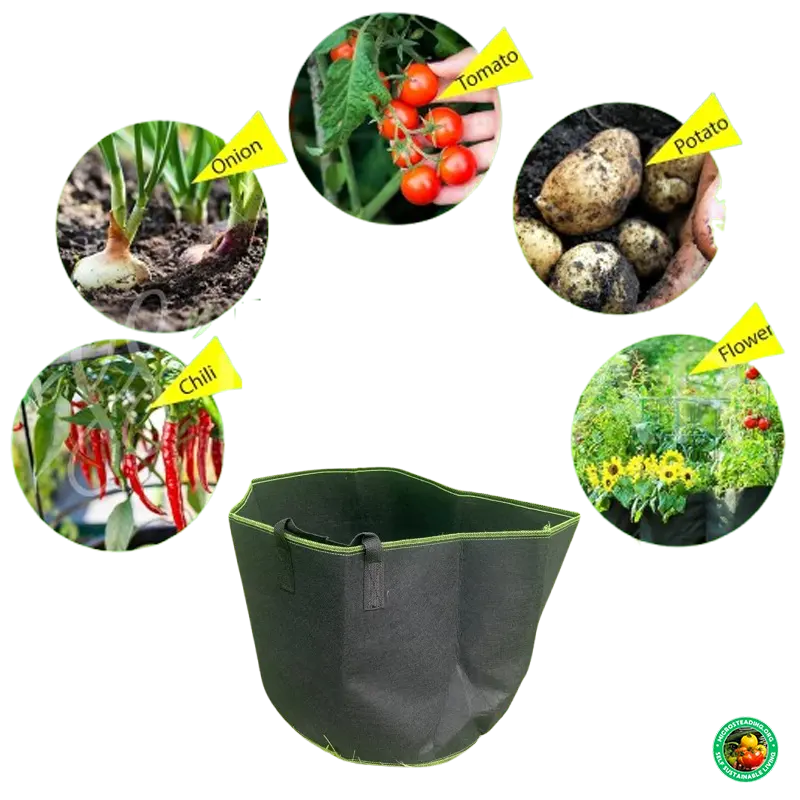
🌿 What Can You Grow in Grow Bags?
Almost anything! Here are just a few crops that thrive in grow bags:
- 🍠 Sweet potatoes (15–20 gallons)
- 🥬 Lettuce and spinach (5 gallons)
- 🌶️ Peppers and chilies (7–10 gallons)
- 🥕 Carrots and radishes (7–10 gallons)
- 🍓 Strawberries (in 3–5 gallon bags or vertical stacks)
- 🧄 Garlic and onions (shallow bags work fine)
Even fruit trees can be grown in massive grow bags with the right soil and regular feeding, but most microsteaders will be more focused on annual vegetables and herbs.
📦 Storing and Reusing Grow Bags
Grow bags are reusable for many seasons. After each crop cycle, dump the soil, rinse the bag, and let it dry thoroughly in the sun. A quick vinegar rinse can restore the fabric if there’s any salt or algae buildup.
Stack them flat in a dry area — they take up far less space than plastic pots or wooden boxes.
🛒 Where to Get Them
Grow bags are widely available online and at garden centers. Look for ones with stitched handles, strong seams, and UV protection if you’re gardening in intense sun. Some brands offer Velcro flaps to harvest root veggies without dumping the soil.
🔗 Related Resources
- Build a BottleCore™ Watering Insert
- Explore Wicking Systems
- Greywater & Rainwater Tips (coming soon)
💡 Ready to level up your garden? Grow bags offer flexibility, performance, and space efficiency — all with less cost and commitment. Whether growing on a balcony, patio, or rooftop, grow bags are your gateway to microsteading success.
Do you have a favorite crop in your grow bags? Share your setup with us in the Microsteading Facebook group, or subscribe for more DIY growing solutions!